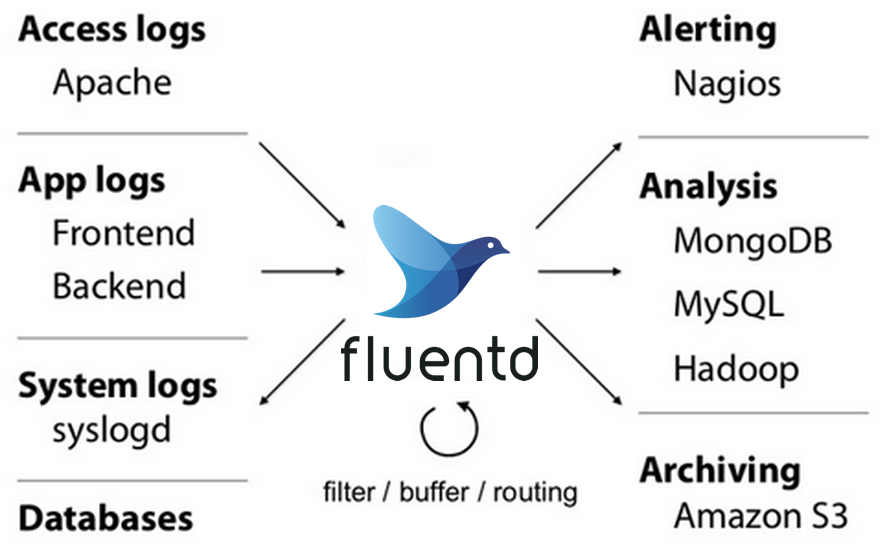
fluentd 的工作原理是从日志源收集日志,然后做数据转换在过滤最后发送到日志存储平台进行分析。官方仓库地址
在使用 fluentd 之前
在使用fluentd之后
配置
fluentd 有如下指令集:
- source 指令定义了从那里获取日志源
- match 指令定义了输出到相应的日志存储平台
- filter 指令定义了如何过滤日志的管道
- system 定义了系统指令设置系统范围的配置
- **label **标签指令对输出进行分组,并对内部路由进行筛选
- worker 仅限于特定的工作器
- @include 包含其它文件
公共插件参数:
- id:表示引用该日志源的唯一标识符,该标识可用于进一步过滤和路由结构化日志数据
- type:Fluentd 内置的指令,
tail表示 Fluentd 从上次读取的位置通过 tail 不断获取数据,另外一个是http表示通过一个 GET 请求来收集数据。 - path:
tail类型下的特定参数,告诉 Fluentd 采集/var/log/containers目录下的所有日志,这是 docker 在 Kubernetes 节点上用来存储运行容器 stdout 输出日志数据的目录。 - pos_file:检查点,如果 Fluentd 程序重新启动了,它将使用此文件中的位置来恢复日志数据收集。
- tag:用来将日志源与目标或者过滤器匹配的自定义字符串,Fluentd 匹配源/目标标签来路由日志数据。
- @log_level: 收集日志级别,默认为 info
测试环境
个人觉得在 Kubernetes 中测试太麻烦,自己在clone了一个官方的仓库编译了一个 fluentd 。 这样在我本地可以更方便的测试 fluentd。以下是安装步骤:
#Step 1 Install Ruby >= 2.6 and bundler on your local environment.
#Step 2: Fetch Source Code
$ git clone https://github.com/fluent/fluentd.git
$ cd fluentd

#Step 3: Build and Install
$ bundle install
$ bundle exec rake build

#Step 4: Run
$ ./bin/fluentd --setup ./fluent
$ tree bin

# Output:
bin
├── fluent-binlog-reader
├── fluent-ca-generate
├── fluent-cap-ctl
├── fluent-cat
├── fluent-ctl
├── fluent-debug
├── fluent-gem
├── fluent-plugin-config-format
├── fluent-plugin-generate
└── fluentd
如果在安装的过程中有包下载不下来。请科学上网多尝试几,直到成功。
最佳实践
配置
在正式开始日志之前我们还需要对 fluentd 输出的日志进行配置。默认输出的是 ttext 我们需要转换成 json 格式方便 ES 进行存储。在配置文件最顶层加入 <system>节点。配置如下:
<system>
  log_level warn
  # 不打印配置文件
  suppress_config_dump true
  <log>
    format json
    time_format %Y-%m-%d %H:%M:%S %z
  </log>
</system>
有关该节点的官方文档在这里
输入
Fluentd 支持很多日志输入格式,正常来说我们一般比较关心程序的日志,像Tcp,Upd ,systemd 这些不常用的大家可以自行去官方文档上查找对应的示例。或者在源码的 example 目录中可以找到相应的例子。我们主要还是来看怎么从文件中读取日志。创建以下配置文件 fluent.conf:
<source>
  @type tail
  format none
  path path/traefik.log
  pos_file path/fluentd_test.pos
  tag test
  rotate_wait 5
  read_from_head true
  refresh_interval 60
</source>

<match test>
  @type stdout
</match>
启动Fluentd
./bin/fluentd -c ./fluent/fluent.conf -vv
启动后 fluentd 就开始读取日志文件了。可以看到有类似以下输出。
2023-09-21 14:35:49.605156000 +0800 test: {"message":"{\"log\":\"{\\\"ClientAddr\\\":\\\"192.168.31.227:23075\\\",\\\"ClientHost\\\":\\\"192.168.31.227\\\",\\\"ClientPort\\\":\\\"23075\\\",\\\"DownstreamContentSize\\\":0,\\\"DownstreamStatus\\\":204,\\\"Duration\\\":204640856,\\\"OriginContentSize\\\":0,\\\"OriginDuration\\\":204374397,\\\"OriginStatus\\\":204,\\\"Overhead\\\":266459,\\\"RequestAddr\\\":\\\"git.cmoee.com\\\",\\\"RequestContentSize\\\":807,\\\"RequestCount\\\":62231,\\\"RequestHost\\\":\\\"git.cmoee.com\\\",\\\"RequestMethod\\\":\\\"POST\\\",\\\"RequestPath\\\":\\\"/api/v4/jobs/request\\\",\\\"RequestPort\\\":\\\"-\\\",\\\"RequestProtocol\\\":\\\"HTTP/1.1\\\",\\\"RequestScheme\\\":\\\"https\\\",\\\"RetryAttempts\\\":0,\\\"RouterName\\\":\\\"kube-ops-gitlab-tls-comee-50e1331ba0311fcd8011@kubernetescrd\\\",\\\"ServiceAddr\\\":\\\"10.122.140.72:80\\\",\\\"ServiceName\\\":\\\"kube-ops-gitlab-tls-comee-50e1331ba0311fcd8011@kubernetescrd\\\",\\\"ServiceURL\\\":{\\\"Scheme\\\":\\\"http\\\",\\\"Opaque\\\":\\\"\\\",\\\"User\\\":null,\\\"Host\\\":\\\"10.122.140.72:80\\\",\\\"Path\\\":\\\"\\\",\\\"RawPath\\\":\\\"\\\",\\\"OmitHost\\\":false,\\\"ForceQuery\\\":false,\\\"RawQuery\\\":\\\"\\\",\\\"Fragment\\\":\\\"\\\",\\\"RawFragment\\\":\\\"\\\"},\\\"StartLocal\\\":\\\"2023-09-15T17:48:06.747155112+08:00\\\",\\\"TLSCipher\\\":\\\"TLS_CHACHA20_POLY1305_SHA256\\\",\\\"TLSVersion\\\":\\\"1.3\\\",\\\"downstream_Cache-Control\\\":\\\"no-cache\\\",\\\"downstream_Content-Security-Policy\\\":\\\"default-src 'none'\\\",\\\"downstream_Date\\\":\\\"Fri, 15 Sep 2023 09:48:06 GMT\\\",\\\"downstream_Gitlab-Ci-Builds-Polling\\\":\\\"yes\\\",\\\"downstream_Server\\\":\\\"nginx\\\",\\\"downstream_Vary\\\":\\\"Origin\\\",\\\"downstream_X-Accel-Buffering\\\":\\\"no\\\",\\\"downstream_X-Content-Type-Options\\\":\\\"nosniff\\\",\\\"downstream_X-Frame-Options\\\":\\\"SAMEORIGIN\\\",\\\"downstream_X-Gitlab-Last-Update\\\":\\\"caa132ecacd0533ad026909ccb375cf6\\\",\\\"downstream_X-Gitlab-Meta\\\":\\\"{\\\\\\\"correlation_id\\\\\\\":\\\\\\\"01HAC3V4Q1DB6R04H117ADDDS0\\\\\\\",\\\\\\\"version\\\\\\\":\\\\\\\"1\\\\\\\"}\\\",\\\"downstream_X-Request-Id\\\":\\\"01HAC3V4Q1DB6R04H117ADDDS0\\\",\\\"downstream_X-Runtime\\\":\\\"0.186561\\\",\\\"entryPointName\\\":\\\"websecure\\\",\\\"level\\\":\\\"info\\\",\\\"msg\\\":\\\"\\\",\\\"origin_Cache-Control\\\":\\\"no-cache\\\",\\\"origin_Content-Security-Policy\\\":\\\"default-src 'none'\\\",\\\"origin_Date\\\":\\\"Fri, 15 Sep 2023 09:48:06 GMT\\\",\\\"origin_Gitlab-Ci-Builds-Polling\\\":\\\"yes\\\",\\\"origin_Server\\\":\\\"nginx\\\",\\\"origin_Vary\\\":\\\"Origin\\\",\\\"origin_X-Accel-Buffering\\\":\\\"no\\\",\\\"origin_X-Content-Type-Options\\\":\\\"nosniff\\\",\\\"origin_X-Frame-Options\\\":\\\"SAMEORIGIN\\\",\\\"origin_X-Gitlab-Last-Update\\\":\\\"caa132ecacd0533ad026909ccb375cf6\\\",\\\"origin_X-Gitlab-Meta\\\":\\\"{\\\\\\\"correlation_id\\\\\\\":\\\\\\\"01HAC3V4Q1DB6R04H117ADDDS0\\\\\\\",\\\\\\\"version\\\\\\\":\\\\\\\"1\\\\\\\"}\\\",\\\"origin_X-Request-Id\\\":\\\"01HAC3V4Q1DB6R04H117ADDDS0\\\",\\\"origin_X-Runtime\\\":\\\"0.186561\\\",\\\"request_Accept\\\":\\\"application/json\\\",\\\"request_Accept-Encoding\\\":\\\"gzip\\\",\\\"request_Content-Length\\\":\\\"807\\\",\\\"request_Content-Type\\\":\\\"application/json\\\",\\\"request_Elastic-Apm-Traceparent\\\":\\\"00-55b1a2f2b796934a0c819b0501306322-94eaeaa3175da649-01\\\",\\\"request_Traceparent\\\":\\\"00-55b1a2f2b796934a0c819b0501306322-94eaeaa3175da649-01\\\",\\\"request_Tracestate\\\":\\\"es=s:1\\\",\\\"request_User-Agent\\\":\\\"gitlab-runner 16.3.0 (16-3-stable; go1.20.5; linux/arm64)\\\",\\\"request_X-Forwarded-Host\\\":\\\"git.cmoee.com\\\",\\\"request_X-Forwarded-Port\\\":\\\"443\\\",\\\"request_X-Forwarded-Proto\\\":\\\"https\\\",\\\"request_X-Forwarded-Server\\\":\\\"traefik-deployment-564d9b448c-jw7zs\\\",\\\"request_X-Real-Ip\\\":\\\"192.168.31.227\\\",\\\"time\\\":\\\"2023-09-15T17:48:06+08:00\\\"}\\n\",\"stream\":\"stdout\",\"time\":\"2023-09-15T09:48:06.9524502Z\"}"}
过滤
可以看到输出的日志格式并不是我们想要的Json格式。修改配置文件如下:
<system>
  log_level warn
  suppress_config_dump true
  <log>
    format json
    time_format %Y-%m-%d %H:%M:%S %z
  </log>
</system>

<source>
  @type tail
  @id in_tail_container_logs
  tag kubernetes
  path /Users/chenhong/learn/fluentd/traefik2.log
  pos_file /Users/chenhong/learn/fluentd/fluentd_test1.pos
  read_from_head true
  <parse>
    @type json
  </parse>
</source>

<filter kubernetes>
  @type parser
  key_name log
  reserve_time true
  <parse>
    @type json
  </parse>

</filter>

<filter kubernetes>
  @type ua_parser
  key_name request_User-Agent
  out_key ua
  delete_key no
</filter>

<match kubernetes>
  @type stdout
  <format>
    @type json
  </format>
</match>
在 source 指令中使用 json 来格式化日志文件。因为我们的日志都在 log 这个字段中。需要使用 filter 打这个字段的 JSON text 转成 JSON 格式。同时还使用了 fluent-plugin-ua-parser 插件来解析我们的UserAgent。最后是match部分是json的格式输出到 stuout。
- 中 kubernetes 的值为 source -> tag 中的值,当然也支持通配符匹配。
输出
重新执行以下命令:
./bin/fluentd -c ./fluent/fluent.conf
{"ClientAddr":"120.244.222.42:9824","ClientHost":"200.114.49.218","ClientPort":"9824","DownstreamContentSize":1242,"DownstreamStatus":200,"Duration":5712908,"OriginContentSize":1242,"OriginDuration":5435634,"OriginStatus":200,"Overhead":277274,"RequestAddr":"grafana.cmoee.com","RequestContentSize":0,"RequestCount":23,"RequestHost":"grafana.cmoee.com","RequestMethod":"GET","RequestPath":"/","RequestPort":"-","RequestProtocol":"HTTP/2.0","RequestScheme":"https","RetryAttempts":0,"RouterName":"default-simpleingressroute-comee-84834b1470f74c85a385@kubernetescrd","ServiceAddr":"10.122.140.67:80","ServiceName":"default-simpleingressroute-comee-84834b1470f74c85a385@kubernetescrd","ServiceURL":{"Scheme":"http","Opaque":"","User":null,"Host":"10.122.140.67:80","Path":"","RawPath":"","OmitHost":false,"ForceQuery":false,"RawQuery":"","Fragment":"","RawFragment":""},"StartLocal":"2023-08-31T19:22:09.443228522+08:00","TLSCipher":"TLS_CHACHA20_POLY1305_SHA256","TLSVersion":"1.3","downstream_Content-Length":"1242","downstream_Content-Type":"text/plain; charset=utf-8","downstream_Date":"Thu, 31 Aug 2023 11:22:09 GMT","entryPointName":"websecure","level":"info","msg":"","origin_Content-Length":"1242","origin_Content-Type":"text/plain; charset=utf-8","origin_Date":"Thu, 31 Aug 2023 11:22:09 GMT","request_Accept":"text/html,application/xhtml+xml,application/xml;q=0.9,image/avif,image/webp,image/apng,*/*;q=0.8,application/signed-exchange;v=b3;q=0.7","request_Accept-Encoding":"gzip, deflate, br","request_Accept-Language":"zh-CN,zh;q=0.9,en;q=0.8","request_Cache-Control":"max-age=0","request_Cookie":"grafana_session_expiry=1692247336; grafana_session=c9caabb076f1656816a803604324f164","request_Elastic-Apm-Traceparent":"00-a5679b0b5ffe43658dbcbb6e38bb1d8b-6ca03e0f49006caa-01","request_Sec-Ch-Ua":"\"Chromium\";v=\"112\", \"Google Chrome\";v=\"112\", \"Not:A-Brand\";v=\"99\"","request_Sec-Ch-Ua-Mobile":"?0","request_Sec-Ch-Ua-Platform":"\"macOS\"","request_Sec-Fetch-Dest":"document","request_Sec-Fetch-Mode":"navigate","request_Sec-Fetch-Site":"none","request_Sec-Fetch-User":"?1","request_Traceparent":"00-a5679b0b5ffe43658dbcbb6e38bb1d8b-6ca03e0f49006caa-01","request_Tracestate":"es=s:1","request_Upgrade-Insecure-Requests":"1","request_User-Agent":"Mozilla/5.0 (Macintosh; Intel Mac OS X 10_15_7) AppleWebKit/537.36 (KHTML, like Gecko) Chrome/112.0.0.0 Safari/537.36","request_X-Forwarded-Host":"grafana.cmoee.com","request_X-Forwarded-Port":"443","request_X-Forwarded-Proto":"https","request_X-Forwarded-Server":"traefik-deployment-564d9b448c-jw7zs","request_X-Real-Ip":"120.244.222.42","ua":{"browser":{"family":"Chrome","version":"112.0.0.0","major_version":112},"os":{"family":"Mac OS X","version":"10.15.7","major_version":10},"device":"Mac"}}
至此使用 Fluentd 收集并加工的一个基本流程就完了。
使用 @label
默认配置文件的调用顺序是从上到下的。使用 @label 后这些部分不遵循从上到下的顺序,而是像链接引用一样。label指令对内部路由的过滤器和输出进行分组。标签减少了标签处理的复杂性。label参数是一个内置的插件参数,所以需要@前缀。 以下例子展示的Lable的用法及输出路径:
<source>
  @type forward
</source>

<source>
  @type tail
  @label @SYSTEM
</source>

<filter access.**>
  @type record_transformer
  <record>
    # ...
  </record>
</filter>
<match **>
  @type elasticsearch
  # ...
</match>

<label @SYSTEM>
  <filter var.log.middleware.**>
    @type grep
    # ...
  </filter>
  <match **>
    @type s3
    # ...
  </match>
</label>

使用 relabel
定义 @label 后只能使用一组 label 指令。如果想在继续使用其它组的 label 就只能使用 relabel 实现。以下例子:
<system>
  log_level warn
  suppress_config_dump true
  <log>
    format json
    time_format %Y-%m-%d %H:%M:%S %z
  </log>
</system>

<source>
  @type tail
  @id in_tail_container_logs
  # 定义 labbel
  @label @KUBERNETES
  tag kubernetes
  path path/traefik2.log
  pos_file path/fluentd_test1.pos
  read_from_head true
  <parse>
    @type json
  </parse>
</source>

# 该组将使用 @KUBERNETES 来处理从 source 中发出来的日志数据
<label @KUBERNETES>
  <filter kubernetes>
    @type parser
    key_name log
    reserve_time true
    <parse>
      @type json
    </parse>
  </filter>

  <match **>
    # 使用 relabel 重新定义Lable 交给下游
    @type relabel
    @label @DSPATCH
  </match>
</label>


# 如果在使用此组在 @KUBERNETES 程序将异常退出
#<label @KUBERNETES>
#    <filter kubernetes**>
#      @type ua_parser
#      key_name request_User-Agent
#      out_key ua
#      delete_key no
#    </filter>
#
#    <match **>
#      @type stdout
#      <format>
#        @type json
#      </format>
#    </match>
#</label>

# 使用 relabel 定义的 @DSPATCH 标签
<label @DSPATCH>
    <filter kubernetes**>
      @type ua_parser
      key_name request_User-Agent
      out_key ua
      delete_key no
    </filter>

    <match **>
      @type stdout
    <format>
      @type json
    </format>
</match>